Microsoft UAG Integration
Introduction
This configuration document outlines how to integrate Swivel with Microsoft Forefront Unified Access Gateway using Active Directory authentication in addition to the Swivel authentication.
If installing Swivel on the UAG appliance it may be required to install Swivel to use a different port than the default 8080.
Prerequisites
This installation guide assumes that publication of the relevant service has already been configured in ISA Server, following the relevant instructions. In addition a working Swivel server version 3.1 or later is required.
If the option to check a user is a Swivel user and issue a OTC field is to be used, this requires Swivel 3.4 or later.
The Swivel Configuration utility requires .Net version 2 or higher. This is not supplied above and must be downloaded and installed if you do not already have it.
The ISA server and its configuration should be fully backed up prior to the Swivel integration.
Allow around 1 hour downtime per ISA server for the integration, and the integration will require a restart of the ISA Firewall Services.
Architecture
The UAG makes authentication requests against the Swivel server by RADIUS or XML.
Installation
Configure The Swivel Server
Configure a RADIUS NAS entry
- Ensure the RADIUS server is running on Swivel
- On the Swivel administration Console select RADIUS NAS
- Enter a name for the NAS
- Enter the UAG internal IP address
- Enter the shared secret
- Click on Apply to save changes
Configure Single Channel Access
- On the Swivel Management Console select Server/Single Channel
- Ensure ‘Allow session request by username’ is set to YES
Configure the UAG
Edit the UAG Configuration Files
Edit the file images.asp with the below URL to represent the Swivel server IP address and Swivel install name:
objWinHttp.Open "GET", "https://<hostname_of_pinsafe>:8443/proxy/SCImage?username=" & request.querystring("username"),false
Where <hostname_of_pinsafe> is your Swivel server hostname.
Then edit Token.inc with the required shared secret:
m_secret = "<secret>"
Where <secret> is your secret (do not enter the angle brackets).
Copy the Configuration files
Note: Ensure any existing files are backed up first.
- Copy Token.inc and Portalname1postpostvalidate.inc to: <path to UAG install>vonInternalSiteincCustomUpdate
- Copy login.asp file to: <path to UAG install>vonInternalSiteCustomUpdate
- Copy images.asp to: <path to UAG install>vonInternalSiteImagesCustomUpdate
Configure the TMG
Create a Threat Management Gateway rule to allow access from the UAG to the Swivel server
On the TMG configuration select New Access Rule and create a rule to allow traffic from the UAG to the Swivel server.
Port 8443 (or port 8080 for software installs, older virtual or hardware appliances and when using XML authentication)
From Local Host (i.e. the UAG)
To Swivel Server (or Internal Network)
Outbound Traffic
Configure Login Page
Select the UAG Configuration GUI, From the Advanced Trunk Configuration select Authentication and set the Login Page to customupdateLogin.asp. This can be changed to reflect a different install location or trunk.
RADIUS authentication Configuration
Swivel can be configured as the Primary authentication server or more usually is configured as a secondary authentication server. When using Swivel as a secondary authentication such as with Active Directory, ensure that the options for secondary authentication are selected.
To enable RADIUS authentication create a repository of type “RADIUS” on the UAG configuration.
To use RADIUS do the following-
- Access the UAG configuration GUI.
- Click on Admin Authentication Users/Group repository
- Select New to create a new repository
- In the drop down menu, select “RADIUS” and in the Name field enter Swivel RADIUS
- Enter the IP of the Swivel server. Note, when using a Swivel HA pair, do not use the VIP address for RADIUS authentication, but use the real IP address.
- Enter port 1812
- If required enter a second IP/port
- Enter a shared secret key of the same value as the Swivel server
- Click on Add and apply this repository to the relevant trunk.
- Ensure User must enter credentials for each server is selected.
- If AD password is to be entered ensure that an AD authentication server is specified.
- Activate the configuration
- Configure Swivel as a RADIUS server
Configuring the URL rewriting rules
To allow access to the images.asp
- Select the required Trunk
- Select Configure from the Advanced Trunk Configuration
- Select the ‘URL Set’ Tab
- Add a rule to permit access to the images.asp
InternalSite_Rule100
Note: This must be named InternalSite_Rule, example: InternalSite_Rule100 (use a high number to prevent it being overwritten by updates)
With parameters of:
Action: Accept
URL: /internalsite/images/customupdate/images.asp
Note: You can use /internalsite/images/customupdate/* for testing, and add additional rules to check the input.
Parameter: Handle (i.e. handle any parameters. For troubleshooting it may be useful to set this to ignore).
Method: Get
-
To Allow access to Swivel specific parameters:
Under Parameters select Add, add the following values:
Parameter 1:
- Name: username
- Name Type: String
- Value: ‘[a-z0-9]+’ (this is a basic regex and may need changing depending on the users username policy)
- Value Type: String
- Length: 1:100 (may need to up 100 depending on customer username length)
- Existence: Mandatory
- Occurrences: Single
- Max total length: -1
- Rejected values checking: on
Parameter 2:
- Name: random
- Name Type: String
- Value Type: Integer
- Existence: Optional
- Occurrences: Single
- Max total length: -1
- Rejected values checking: on
Edit Rule to allow Access to the validate.asp
- Select the validate.asp rule (Usually Internal_Rule2)
- Under Parameters select Ignore
Alternatively add the following to the parameters list:
Turing
SMS
To Allow access to Swivel specific parameters:
Select the InternalSite_Rule2
Under Parameters select Add, add the following values:
Name: swivel
Name Type: String
Value:
Value Type: String
Length: 1:100
Existence: Optional
Occurrences: Multiple
Max total length: -1
Rejected values checking: on
-
Also add a Parameter with the following values:
Name: orig_url
Name Type: String
Value:
Value Type: String
Length: 1:200
Existence: Optional
Occurrences: Multiple
Max total length: -1
Rejected values checking: on
To allow access to the ChangePIN application
- Select the required Trunk
- Under Applications select Add
- Click the Web Applications Radio App and Generic Web App then Next
- Enter Application name ChangePIN and Application Type: pinsafe then Next
- Enter the ChangePIN IP address, and under path the location of the ChangePIN install (normally changepin), set the port to 8443, then Next
- Select Next
- Check details are correct, specifically https://<IP Address>:8443/changepin and then Finish
NOTE: If changing the IP address then change the IP address in the Application Properties on the Web Servers and the Portal Applications tabs.
Verifying the Installation
Browse to the login page, select TURing and enter a username, the Turing image should appear. Test using the SMS option. Check for requests on the Swivel server.
UAG Login Page
UAG login using SMS
UAG login using Turing Single Channel Image
Successful RADIUS authentication
The following user logged into trunk “test” (secure=0): User: admin; Source IP: 192.168.9.87; Authentication Server: PINsafe RADIUS; Session: B9FCC62A-B073-445D-9AAE-2FB1109EE5E6.
Troubleshooting
Check the Swivel server logs and system event logs for any errors or lack of communication as well as the UAG logs. Attempt a login and if required the TURing image, to generate an event then view it under under Admin/Web Monitor/Event Viewer/Security. Check the ISA server logs.
From a web browser on the UAG check to see if it is possible to generate a Turing image https://<IP address of Swivel server>:8443/proxy/SCImage?username=test
If the changes made in the UAG are not reflected in the login page, allow sufficient time for the rules to be written on the TMG (wait 10 minutes).
Request failed, the URL contains an illegal path. Trunk: test; Secure=0; Application Name: Whale Internal Site; Application Type: InternalSite; Rule: Default rule; Source IP: 192.168.9.87; Method: GET; URL: /InternalSite/Images/customupdate/images.asp?username=admin
URL blocking by the UAG. Check that the image can be rendered and that the URL rewriting rules are correct
The URL /internalsite/images/customupdate/images*.asp contains an illegal path. The rule applied is Default rule. The method is GET.
When the message The rule applied is Default rule is seen, it means that no rule has been matched and by default the URL is blocked. In the above example the path is incorrect to images.asp.
Http 500 error
If you get an http 500 error when using xml based integration you may need to edit the token.inc file so that
Set objWinHttp = Server.CreateObject("WinHttp.WinHttpRequest.5")
is replaced with
Set objWinHttp = Server.CreateObject("WinHttp.WinHttpRequest.5.1")
Ensure that the UAG can resolve the Swivel server name when hostname is used for connecting by RADIUS. Try with the IP address of the Swivel server.
Additional Configuration Options
RADIUS Challenge and Response
The UAG and Swivel supports the use of Challenge and Response authentication.
On the Swivel Administration Console ensure two-stage authentication is set to “Yes” for the RADIUS NAS definition. Secondly, under Server -> Dual Channel, ensure On demand authentication is set to “Yes”.
In order to use two-stage authentication on Swivel, all users have to have a password defined. There are two ways to manage this: either set a password for each user under user administration, or enable the option to check password with repository (under Policy -> Password), in which case Swivel uses the AD password. Either way, you need to enter the password for Swivel as well as the AD password. (It might be possible, using the repository password option, to have a custom page that copies the AD password to the Swivel password, but this has not been tested).
If the Swivel password is entered correctly, you will be sent a security string, and a second login page will be displayed, to enter your one-time code.
PINpad Integration
PINpad integration can be accomplished using these files, and a slight modification to the installation procedure. Please note that this zip file reflects the relative locations of the 3 files included, starting from “InternalSite”. The login page goes into /InternalSite/customupdate and the other two into /InternalSite/images/customupdate.
Please ensure that you have Pinpad enabled on your Swivel virtual or hardware appliance, following the instructions here.
Use pinpad.asp instead of images.asp from the original integration, and edit this in a similar way, replacing the internal URL for the Swivel appliance. Keep everything from “/proxy/SCPinPad” as it is. You will also need to make a similar change to StartSession.asp. One important difference to recognise with this solution is that it makes a session start request explicitly. Therefore, you cannot use the /proxy application. Instead, you must use port 8080 and context /pinsafe on a virtual or hardware appliance. This also means that you must have PINsafe version 3.9.2 or later, since earlier versions do not support PINpad natively. Make sure that the firewall rule is configured appropriately. If you have an earlier version of PINsafe, either upgrade, or use this older solution. If you use the older solution, note the differences below, and ignore any references to StartSession.asp.
Use /customupdate/loginpinpad.asp as the login page.
When configuring the URL rewriting rules, you will need to include pinpad.asp and StartSession.asp in /images/CustomUpdate as accepted pages, unless you have allowed all pages in /images/CustomUpdate. Either set “ignore” for all parameters for these pages, or else permit the following parameters:
- pinpad.asp:
- sessionid (or username for the old solution)
- fell
- StartSession.asp
- username
- random
NOTE: this login page assumes that PINsafe is the primary authentication. If it is the secondary, you need to edit the login page (loginpinpad.asp) and change the following line
var PINSAFE_PASSWORD_INDEX = 0;
to this:
var PINSAFE_PASSWORD_INDEX = 1;
ChangePINpad Integration
When publishing access to ChangePINpad, ensure that you enable the following paths during creation:
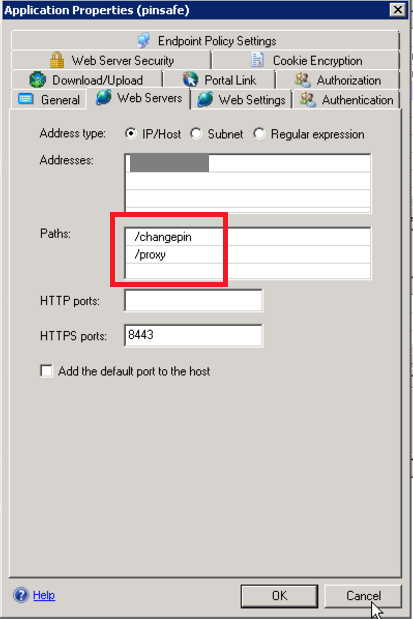
This should in turn create the following rules:

Beware that if you add paths to the published application afterwards, the rules for these paths will not be created. So ensure that you enter the paths at creation time.
Button size and aspect ratio
The Button size and aspect ratio is controlled by the settings in the login page:
document.all.otp.innerHTML = ‘<img src=”/InternalSite/customupdate/FetchTuring.asp? username=’ + otpusername +’” height=”81” width=”300”>’; }
change the height and width settings to the value that is appropriate.
XML Authentication
Configuring XML authentication (when not using RADIUS)
XML authentication has not been tested with the current version of UAG and is supplied for reference if required, RADIUS authentication is the preferred method of authentication.
Note that when using a Swivel virtual or hardware appliance with a proxy configured, the XML requests need to be made to the https://<IP>:8080/pinsafe address rather than the proxy address. This applies currently to all Swivel virtual or hardware appliance versions.
This step is not required when RADIUS authentication is used. RADIUS authentication is the preferred method of authentication. To enable the token.inc file, create a repository of type “Other” on the UAG configuration. The repository you create must match the name of the file (ie, if the inc file is called Token.inc, the repository must be named Token).
Configure a Swivel Agent (For XML Authentication)
- On the Swivel Administration Console select Server/Agent
- Enter a name for the Agent
- Enter the UAG internal IP address
- Enter the shared secret
- Click on Apply to save changes
To create the repository, do the following-
- Access the UAG configuration GUI.
- Click on Admin Authentication Users/Group repository
- Select New to create a new repository
- In the drop down menu, select “Other” and in the Name field type in the name of the inc file (See screen shot below)
- Click on Add and apply this repository to the relevant trunk.
- Activate the configuration
Edit the file Token.inc with the required shared secret and to represent the Swivel server IP address and Swivel install name, Note for all Swivel installs this needs to point to the PINsafe server on port 8080 and not the proxy port 8443.
m_secret = "secret"
objWinHttp.Open "GET", "https://192.168.1.1:8080/pinsafe/AgentXML?xml=" & m_request, false
Note If you get an http 500 error when using xml based integration you may need to edit the token.inc file so that
Set objWinHttp = Server.CreateObject("WinHttp.WinHttpRequest.5")
is replaced with
Set objWinHttp = Server.CreateObject("WinHttp.WinHttpRequest.5.1")
Edit the file Portalname1postpostvalidate.inc to represent the PINsafe server IP address and changePIN install name:
'response.redirect "https://192.168.1.1:8443/changepin"
g_orig_url = "https://192.168.1.1:8443/changepin"
Known Issues and Limitations
If upgrading the UAG to a higher service pack, the configuration files, particularly login.asp may be overwritten. Verify the files after an upgrade. Also note that the URL rewriting rules may differ from version to version, so these should also be verified.
Upgrading from RTM Update 2, to SP1 will cause the InternalSite rules, on the UAG to be removed, or changed back to defaults.
If the login page is viewed incorrectly as a mobile page then this workaround will allow the correct page to be displayed, and works with Windows 7 and Windows 8.
Additional Information
For assistance in the Swivel installation and configuration please firstly contact your reseller and then email Swivel Secure support at support@swivelsecure.com