AD Agent
Important
The AD Agent is primarily designed for Swivel Cloud deployments.
If you are using an on-premise Swivel Secure appliance, the Active Directory integration functionality is already built directly into the core appliance, and you do not need to install this separate agent.
Note
This documentation applies to AD Agent Version 1.5 and later. This version differs significantly from previous releases as Java and Apache Tomcat are no longer embedded in the installer and must be installed separately.
Introduction
The AD Agent allows you to synchronise the Swivel Core with a remote Active Directory instance. Version 1.5 introduces several improvements:
LDAP over TLS: Significantly improved support for LDAPS.
Configuration Backup: The upload/download feature now backs up the entire configuration, not just Sentry connection properties (as of v1.5.7).
Two-way Synchronisation: A new feature allowing two-way sync with Sentry.
Prerequisites
Operating System
The product runs on most recent Windows operating systems.
Supported: Windows Server 2019, 2022, and Windows 11.
Java Runtime Environment
This product requires Java 8 or later.
Recommended: OpenJDK 15.
Download: OpenJDK 15 (Windows x64).
Note: It will work with OpenJDK 8, but the trusted certificate store is empty by default, requiring manual configuration.
Apache Tomcat
The agent requires a web application server.
Recommended: Tomcat 9.
Download: Apache Tomcat 9 (Windows Service Installer).
Warning: Testing has failed with Tomcat 10, so do not select that version.
Warning
Ensure that your Java and Tomcat architectures match. A 32-bit Tomcat will not run on 64-bit Java, and vice versa.
Installation Guide
Download the latest version: installers/ADAgentInstaller.1.5.7.zip
Step 1: Install Java
Install your chosen Java Runtime Environment first. If using OpenJDK, unzip the files to a known location (e.g., C:\Program Files\OpenJDK\jdk-15.0.2).
Step 2: Install Apache Tomcat
Run the Apache Tomcat Windows Service Installer.
Important: Ensure you select the Service Startup and Native options.
You may uncheck optional components like Documentation, Manager, and Examples.
During installation, you will be asked to provide the location of your Java installation. Point this to the folder created in Step 1.
Complete the installation and ensure the Tomcat service is running.
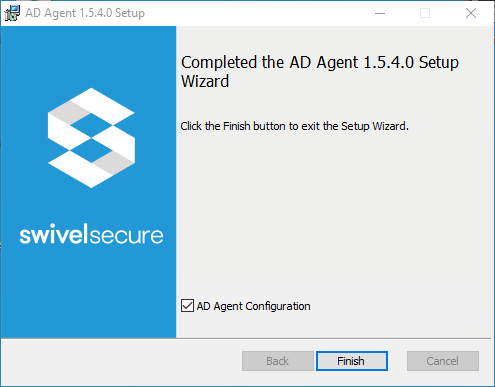
Step 3: Install AD Agent
Run the AD Agent
.msiinstaller.Follow the setup wizard. The installation does not require Java or Tomcat to be present to finish the file copy phase.
At the end of the wizard, ensure AD Agent Configuration is checked and click Finish.
Step 4: Deploy to Tomcat
When the configuration program launches:
The tool will attempt to detect your Tomcat Service.
If detected, it will appear in the dialog. If not, click Configure Tomcat… and manually select your Tomcat folder.
Click Deploy. This copies the AD Agent application into the Tomcat webapps folder.
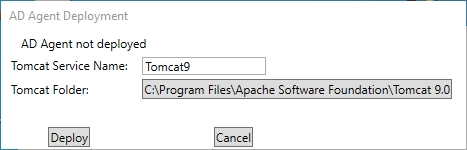
Once deployed, click Apply to restart the Tomcat service and apply settings.
Configuration
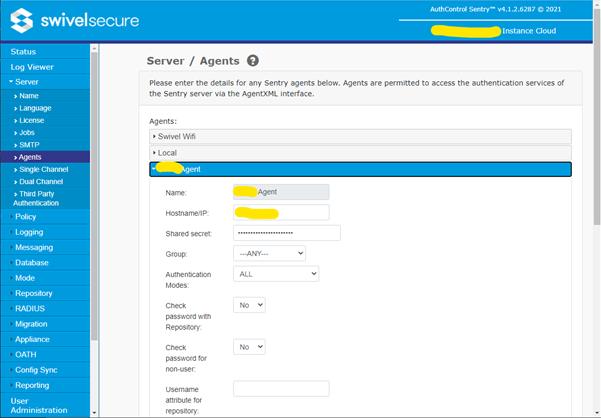
Preparing Sentry
Before the Agent can connect, you must create an entry for it on your Swivel Sentry Core.
Log in to your Sentry Core Administration Console.
Navigate to Server > Agents.
Enter a Name for the agent.
Enter the Hostname/IP of the AD Agent server.
Enter a Shared Secret. Keep a note of this, as you will need it later.
Ensure Can act as Repository is set to Yes.
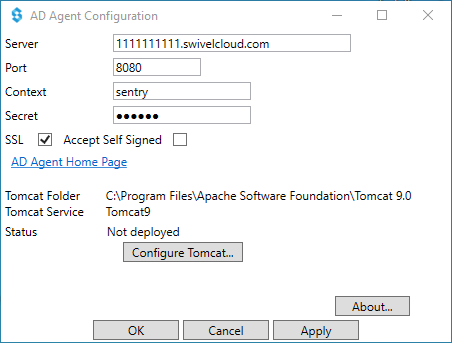
Configuring the AD Agent
On the AD Agent server, open the configuration tool (or navigate to http://localhost:8080/adagent).
Server: Enter the hostname/IP of your Sentry Cloud instance.
Secret: Enter the Shared Secret you created in the Sentry console.
SSL: Check this box if connecting to Sentry via HTTPS (Recommended).
Click Apply or OK to save and restart the service.
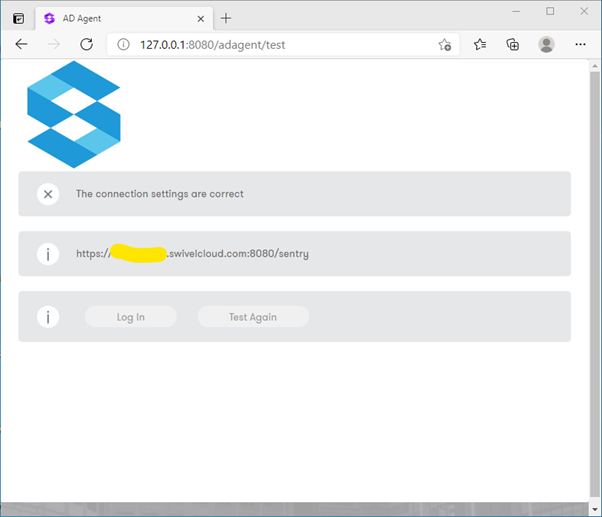
Testing the Connection
Open a browser and navigate to the AD Agent Home Page (e.g.,
http://localhost:8080/adagent).Click Test Connection.
Success: You will see a confirmation that connection settings are correct.
Failure: If you see “The Agent has not been configured or the secret is incorrect,” check your IP and Secret settings on both Sentry and the Agent.
Active Directory Settings
Navigate to the AD Settings menu to connect the Agent to your Domain Controller.
Server: IP or Hostname of the Domain Controller.
Port: 389 (Standard) or 636 (LDAPS).
Username: The AD account used to read data (e.g.,
userPrincipalName).Password: The account password.
LDAPS Configuration: If using port 636, ensure SSL is checked. If using a self-signed certificate on the DC, check Self-Signed Certs, but note that the hostname must match the certificate exactly.
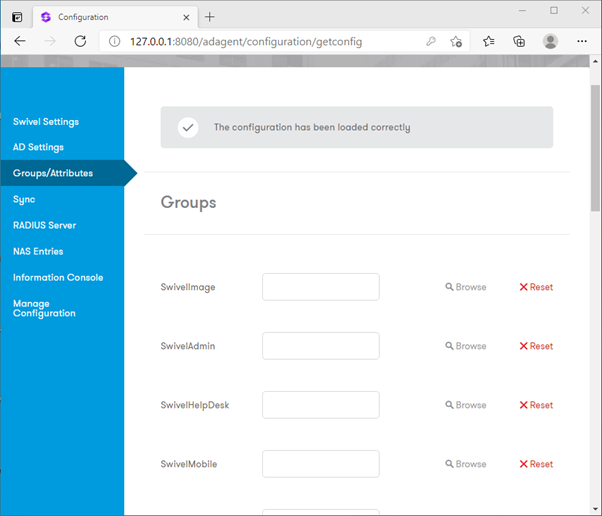
Groups and Attributes
Navigate to Groups/Attributes to map AD groups to Sentry.
Click Get Config. This downloads the available groups from Sentry.
Click Browse next to a group (e.g.,
SwivelUsers).Select the corresponding Active Directory group from the list.
Synchronization
Navigate to the Sync tab.
Scheduled sync: Check this box to enable automatic updates.
Manual Sync: Click Sync to force an immediate update. This resyncs all users, whereas scheduled sync is incremental.
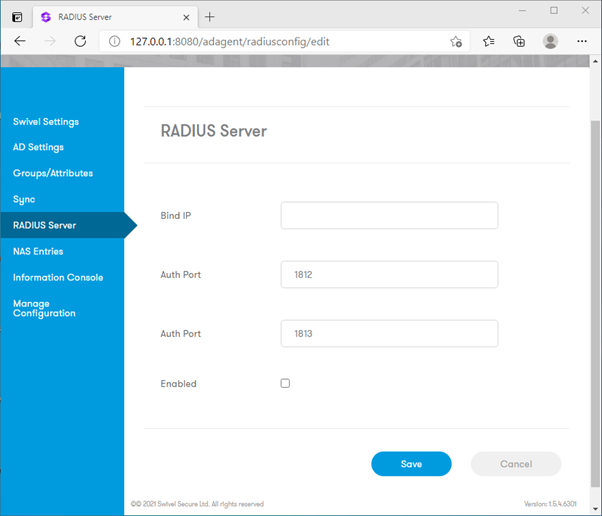
RADIUS Server
The AD Agent includes a built-in RADIUS server, allowing it to handle RADIUS requests from your local network and relay them to Sentry as AgentXML login requests. This is particularly useful for local VPN gateways or network devices that require RADIUS authentication.
Bind IP: Specify the IP address to bind the RADIUS service to (leave blank to bind to all interfaces).
Auth Port: The UDP port to listen on for authentication requests (default 1812).
Enabled: Check this box to start the local RADIUS server service.
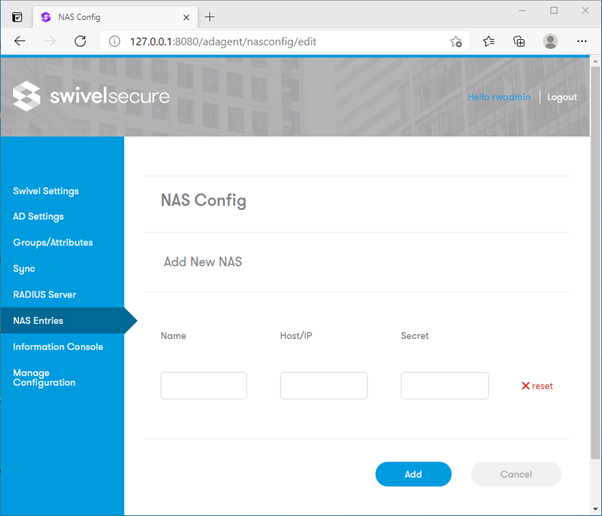
NAS Entries
To allow a device (such as a VPN gateway) to communicate with the built-in RADIUS server, you must define it as a NAS (Network Access Server) Client.
Navigate to the NAS Entries tab.
Enter a Name to identify the device.
Enter the Host/IP address of the device.
Enter the Secret (this must match the shared secret configured on the device itself).
Click Add.
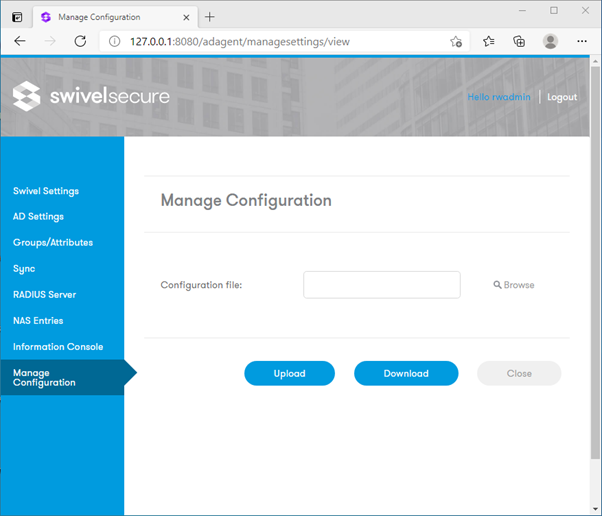
Backup and Restore
As of version 1.5.7, you can export the entire AD Agent configuration.
Navigate to Manage Configuration.
Click Download to save a backup of your settings.
Click Upload to restore settings to this or another device.