SSL Certificates
Overview
AuthControl Sentry Appliances ship with a self-signed certificate which prompts users to accept a security warning when the TURing image or Sentry web interface is presented within a web browser. When an AuthControl Sentry system goes into production, a valid signed certificate from a Trusted Certificate Authority (CA) should be installed onto the appliance.
This article describes how to install a valid certificate using the AuthControl Sentry Appliance.
Prerequisites
AuthControl Sentry Appliance with Console Management Interface (CMI) access (via SSH or console).
A valid DNS name for the AuthControl Sentry instance (usually pointing to the public IP address or VIP).
Backup: Ensure a backup of the existing keystore exists before making changes.
Considerations
HA Appliances using VIP For HA appliances, if a VIP (Virtual IP) is used, the certificate must be bound to the hostname that resolves to that VIP. Once a signed certificate is setup on the Primary appliance, the keystore can be copied to the Standby appliance.
NAT Address and Certificates Where the AuthControl Sentry Appliance or HA VIP is behind a NAT, the DNS entry used for the public IP address is usually used as the hostname for the certificate.
Installation Methods
There are three methods to install a certificate on the AuthControl Sentry Appliance. Please choose the one that best fits your requirements:
- Method 1: Import Existing PFX (Recommended)
This method is faster and less prone to error. It involves using a complete certificate file (PKCS#12/.pfx) which may have been provided directly by your Certificate Authority, or exported from another server (e.g., Windows IIS).
- Method 2: Generate CSR via Appliance
This method involves creating a private key on the appliance, generating a request, and importing the individual certificate files returned by the CA.
- Method 3: Automated ACME Deployment (Roadmap)
✨ Coming in 2026, this method will support the ACME protocol for automatic certificate issuance and renewal (e.g., Let’s Encrypt).
Method 1: Import Existing PFX (Recommended)
1. Prepare the PFX File
Ensure you have a valid .pfx (or .p12) file. This file may have been provided directly by your Certificate Authority (CA) or exported from another server. It must contain:
* The Private Key.
* The Server Certificate.
* The full Intermediate/Root Chain.
2. Upload to Appliance
Use a tool like WinSCP or FileZilla (SFTP) to upload your .pfx file to the appliance folder:
/backups/upload/
3. Import via CMI Menu
Log in to the CMI via SSH or Console.
Navigate to Tomcat > Certificates.
Select Import / Roll Back to Previous Keystore.
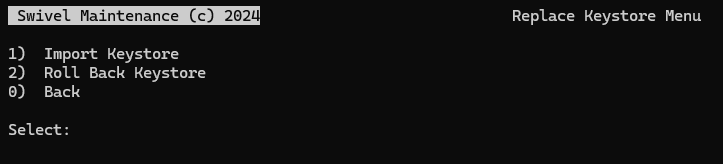
Select Import Keystore.
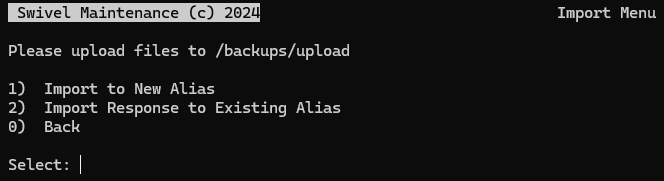
The system will display the files located in
/backups/upload/.Note
If your file is not listed, select the REFRESH DIRECTORY option. The numbering of files may change as new files are added or removed.

Select the number corresponding to your PFX file from the list and press Enter.
Follow the onscreen prompts to complete the import (you may be asked for the PFX password).
Once the import is complete, proceed to Restart Tomcat.
Method 2: Generate CSR via Appliance
Use this method if you do not have a PFX file and wish to generate the Private Key directly on the appliance.
1. Access Certificate Menu
From the CMI Main Menu, select Tomcat.
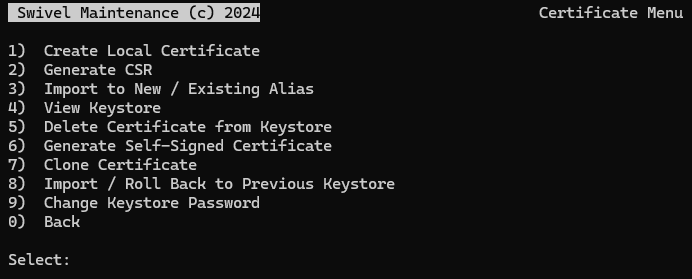
Select Certificate Management.
2. Create a Local Certificate
Select Create a local Certificate.
Alias: The default and recommended alias is
swivel.Keystore Password: Default is usually
lockbox.Certificate Details: * First and Last Name (CN): The Hostname or FQDN (e.g.,
sentry.example.com). * Organizational Unit, Organization, City, State, Country: Enter your organization’s details.
3. Generate a CSR
Select Generate CSR.
Enter the alias used above (
swivel).Download the generated CSR file from
/backups/upload/<alias>.csrusing WinSCP.
4. Apply for the Certificate
Submit the CSR to your CA, selecting Tomcat or Java as the server type. Download the certificate (Response) and the Root/Intermediate bundle.
5. Import the Certificate
Important: You must import the certificates in the correct order: Root/Intermediates first, then the Response.
A. Copy Certificates to the Appliance
Upload your Root CA, Intermediate CA(s), and Server Certificate to /backups/upload/.
B. Import Intermediate/Root Certificates
In Certificate Management, select Import to New / Existing Alias.
The system will display the list of files. Select the number corresponding to your Intermediate or Root certificate.
When prompted to select an alias, type a unique New Alias name (e.g.,
intermediate1).Repeat this process for all intermediate and root certificates, giving each a unique alias.
C. Import the Server Certificate (Response)
Select Import to New / Existing Alias.
Select the number corresponding to your Server Certificate file (Response) from the list.
When prompted, select the Existing Alias option.
Choose the alias corresponding to your private key (usually
swivel).
Method 3: Automated ACME Deployment (Roadmap)
Note
Roadmap Feature: Support for the ACME standard is currently in development and scheduled for release in 2026.
Future versions of AuthControl Sentry will support the Automated Certificate Management Environment (ACME) protocol. This will enable appliances to automatically interface with Certificate Authorities such as Let’s Encrypt to request, validate, and install trusted SSL certificates without manual intervention.
This roadmap feature addresses the industry shift towards shorter certificate lifecycles and aims to provide:
Zero-Touch Renewal: Certificates will renew automatically before expiration.
Simplified Validation: Support for HTTP-01 and DNS-01 validation challenges.
Cost Reduction: Native integration with free, automated CAs.
Please check the Swivel Secure release notes and announcements for updates on the availability of this feature.
Final Steps (All Methods)
Verify Keystore
Go to Tomcat > Certificate Management > View Keystore.
Check the
swivelalias.Ensure Entry Type is
PrivateKeyEntry.Ensure Certificate chain length is greater than 1.
Restart Tomcat
For changes to take effect, restart the service:
1. Go to the Tomcat menu.
2. Select Stop then Start (or Restart).
3. Verify access via your browser (e.g., https://sentry.example.com:8443).
Exporting Certificate to Standby Appliance (HA)
In a High Availability (HA) pair using a VIP, generate/import the certificate on the Primary appliance, then copy the keystore to the Standby.
Backup: Backup
/home/swivel/.keystoreon the Standby.Copy: Copy
/home/swivel/.keystorefrom Primary to Standby (same location).Permissions: Run the following on the Standby via Command Line:
chown swivel:swivel /home/swivel/.keystore
chmod 600 /home/swivel/.keystore
Restart: Restart Tomcat on the Standby appliance.
Troubleshooting
“Public keys in reply and keystore don’t match”
(Method 2 Only) You are importing a certificate onto an alias that did not generate the CSR. Ensure you strictly follow the “Import to Existing Alias” step on the correct swivel alias.
Certificate shows as “trustedCertEntry” This means the private key is missing. * Method 1: The PFX import failed to map the key. Check the source alias. * Method 2: You likely imported the response as a “New Alias”.
Restoring a Previous Keystore If an import fails or breaks the service, you can roll back to a previous state: 1. Navigate to Tomcat > Certificates. 2. Select Import / Roll Back to Previous Keystore. 3. Select Roll Back Keystore. 4. Choose a backup file from the list to restore.