Sentry SSO with Juniper
Introduction
This article explains how to integrate a Juniper SSL VPN with Sentry.
If focusses on the setting up of Sentry and the modification of the login pages to support the Sentry integration.
It assumes knowledge of how to configure the Juniper to use Sentry as a RADIUS authentication server. Details of these elements can be found in the existing integration guides Category:Juniper
For this integration it is recommended that the Swivel Radius server is the only authentication required for this realm.
Overview
The integration works by
configuring the Juniper login page to redirect the user to Sentry to authenticate
user authenticates at Sentry
user is redirected back to the Juniper login page with a claim
Juniper login page is submitted with username and claim
Username and claim are validated via RADIUS
User gains access
Therefore the following steps are required
Configure Juniper Login
Configure Sentry to work with Juniper login page
Configure Sentry to accept RADIUS requests from Juniper
Configure Juniper Login
To modify the login pages download the sample.zip file from your Juniper and make the required changes to LoginPage.thtml. If you also wish to support mobile devices you will need to make the same changes to the other login pages, eg LoginPage-mobile-webtoolkit.thtml
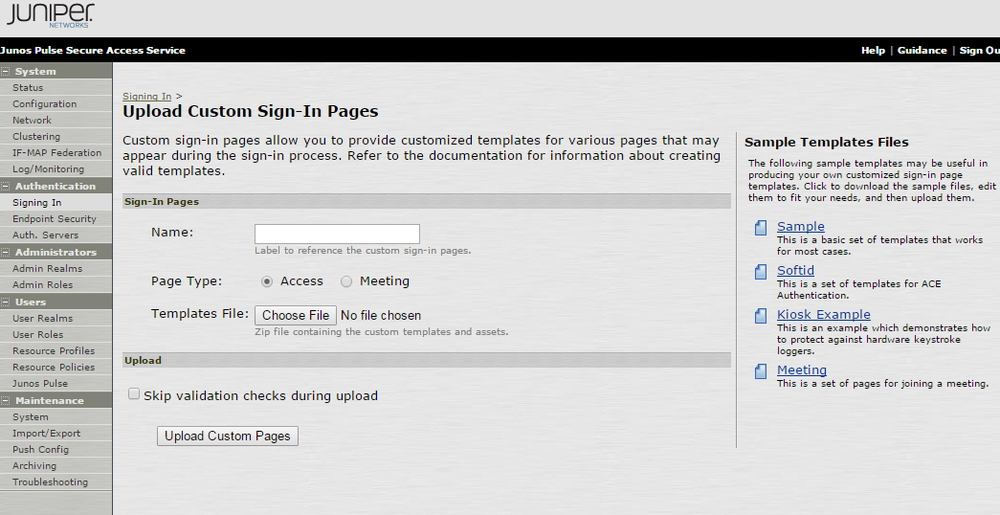
sample.zip can be found on Upload Custom Sign-In Pages, which can be found on Signing-in -> Sign-in Pages -> Upload Custom Pages… There you will be able to see Sample Templates Files on the right side corner as shown below:
In order to make the Juniper page work in the desired way once the page has loaded the page must detect if the user has been redirected to this page from the Sentry Auth Manager or if the user have come directly.
If the user has come directly they need to be redirected to Sentry Auth Manager. If they have been directed from Sentry Auth Manager the login form needs to be populated and submitted.
This is the required snippet that needs adding to the head (eg between the <head> and </head> tags) section of the login pages.
The only modification required is to change SENTRYURL for the actual public url of your sentry install.
Note the applicationNameNoSAML=JuniperVPN This is important as this application name must match the settings on Sentry
<script src="https://ajax.googleapis.com/ajax/libs/jquery/1.11.0/jquery.min.js" ></script>
<script>
function redirect()
{
   window.location.replace("https://SENTRYURL/noSamlEndPoint?returnurlNoSAML="
   + window.location.href + "&applicationNameNoSAML=JuniperVPN" );
}
var QueryString = function () {
   // This function is anonymous, is executed immediately and
   // the return value is assigned to QueryString!
   var query_string = {};
   var query = window.location.search.substring(1);
   var vars = query.split("&");
   for (var i=0;i<vars.length;i++) {
      var pair = vars[i].split("=");
      // If first entry with this name
      if (typeof query_string[pair[0]] === "undefined") {
         query_string[pair[0]] = pair[1];
         // If second entry with this name
      } else if (typeof query_string[pair[0]] === "string") {
         var arr = [ query_string[pair[0]], pair[1] ];
         query_string[pair[0]] = arr;
         // If third or later entry with this name
      } else {
         query_string[pair[0]].push(pair[1]);
      }
   }
   return query_string;
} ();

$(document).ready(function() {
   usernamePassedIn = QueryString["username"];
   passwordPassedIn = QueryString["password"];
   claimPassedIn = QueryString["claim"];
   if(typeof claimPassedIn == 'undefined') {
      redirect();
   } else {
      $('[name=password]').val(claimPassedIn);
      $('[name=username]').val(usernamePassedIn);
      // $('[name=user#2]').val(usernamePassedIn);
      // $('[name=password#2]').val(claimPassedIn);
      document.getElementsByName("frmLogin")[0].submit();
   }
});
</script>
Configuring Logout
So that when a user logs out of the Juniper they are also logged out of their Sentry session, the Juniper logout pages need to redirect the user to the Sentry single Logout page. This is a simpler version of the modifications made to the login page. The following code needs adding to the page in the logout.thtml file (and mobile device equivalents)
<script src="https://ajax.googleapis.com/ajax/libs/jquery/1.11.0/jquery.min.js" ></script>
<script>
function redirect() {
   window.location.replace("https://SENTRYURL/singlelogout");
}
$(document).ready(function() {
   redirect();
});
</script>

hostnamectl set-hostname <hostname>
Configure Juniper
After you have set up the login and logout pages you should upload them to Juniper (as a zip file) like on the screen here Sentry SSO with Juniper#Configure Juniper Login.
After you have uploaded the pages, you should configure the Authentication Realms for the new pages that you have created, to do so you have to click on the Signing In from the left menu. You will be shown the page as below:

You have to click on the User URL and select the realm from the available realms box by clicking on it and clicking Add-> button. Refer to the screenshot below.

You have to click on your Authentication Realm which you should have set for your user URL.

After clicking on the Authentication Realm you should click on Role Mapping and add a new rule by clicking New Rule In the rule you have to set a rule like on the screenshot below. This rule will assign the users their role for your Juniper network.

After setting up Juniper you should be able to proceed by setting up the Sentry Auth Manager.
Configuring Sentry Login
The Juniper VPN needs to be added to Sentry as an Application.
The following entries are required.
Name This must match the name in the redirect url, eg JuniperVPN
Service Provider SwivelVPN. Indicates this is a VPN integration
Points Number of points required to access the VPN, refer to Sentry User guide
Endpoint URL This is the URL of the Juniper login page configured to work with Sentry
Entity ID Should match Name.
Configuring Sentry RADIUS
To complete the integration the Juniper VPN must be added as a NAS on the Sentry server.
The key settings are
Identifier Must match the Name on Sentry login, eg JuniperVPN
Hostname Must match IP of Juniper VPN
Two stage auth, Check Password with repository should be set to NO
SSO
For RADIUS VPN applications the login page will be displayed although Sentry has been configured with SSO enabled. That attribute just applies for SAML applications.
Authentication with AD/LDAP and Radius
To be able to authenticate with both AD/LDAP and Radius when logging in you have to add few minor changes. You have to modify the script which you have added at this step Configure Juniper Login
You have to uncomment two lines:
//$('[name=user#2]').val(usernamePassedIn);
//$('[name=password#2]').val(claimPassedIn);
by removing double forward slashes in front of the $ sign, so it would look like below:
$('[name=user#2]').val(usernamePassedIn);
$('[name=password#2]').val(claimPassedIn);
And you have to change the password line above the uncommented code from.
$('[name=password]').val(claimPassedIn);
To the line below, in the password field we will pass now the password and the claim in the password#2 which we have uncommented above.
$('[name=password]').val(passwordPassedIn);
When you have updated the page, you have to re-upload it by following the same steps like previously on Configure Juniper Login
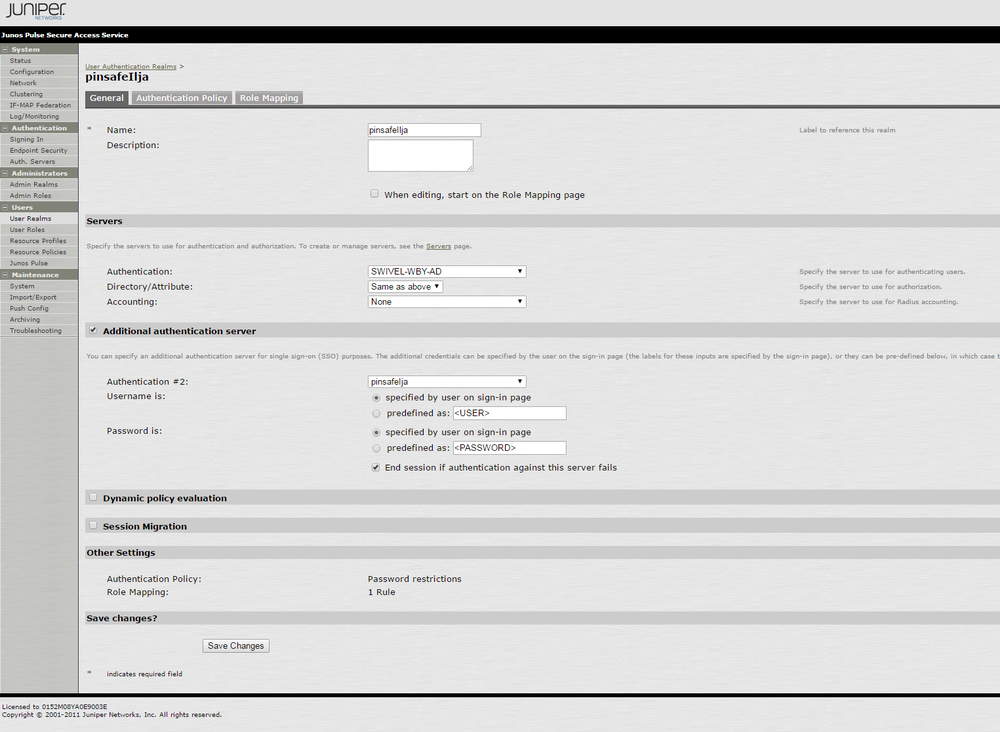
After uploading the the index page you have to change settings on your authentication realm to do so, you have to select your authentication realm and first to add the authentication server to be your AD/LDAP. After selecting the authentication server you should select “Additional authentication server” check box and select a previously created Radius server authentication method. The Authentication Realm settings should look similar to the once on the screenshot below:
Testing
Goto to Juniper login url
User redirected to Sentry, user should be prompted for credentials
Supply credentials
Should see Sentry logs including
Login successful for user: username
SSO_CLAIM_CREATED_FOR_USER, username
User should be redirected to Juniper VPN
User should gain access
Logs should include
JuniperVPN:Processing user username as channel CLAIM
JuniperVPN:Login successful for user: username